Working with DocuSign
A Starting point
Recently my customer made the business decision to streamline their contracting process. Currently a sales agent will create a set of documents which will be downloaded, printed and signed off by the prospect. Once the prospect signs the contract, it is faxed back and countersigned. After countersigning, the document would be scanned and saved for reference.
After much due diligence, my customer decided to go with a solution provided by DocuSign. It provides the ability to send documents to recipients for their viewing and / or approval.
Background
I was tasked with incorporating this solution using a set of APIs provided by DocuSign. The API calls are provided as both SOAP and Rest implementations and feature an extensive array of documentation and tools to help with implementation.
I made the decision to go forward with the Rest implementation because of the ease of implementation and configuration.
DocuSign provides an API Explorer allowing you the opportunity to explore the API without writing any code. Before using the explorer you will need to create a free developer account with which you can explore both the API and the administration portal of your account.
https://www.docusign.com/developer-center#form-devaccount
Using the portal, you can learn some of the capabilities of DocuSign including creating a new document(s) from uploading an existing document, using a template or getting from a cloud service such as Dropbox or OneDrive. Additionally you will learn to create the email distribution list to send the document(s) to, as well as how to set their order and what each person has to do in the document chain.

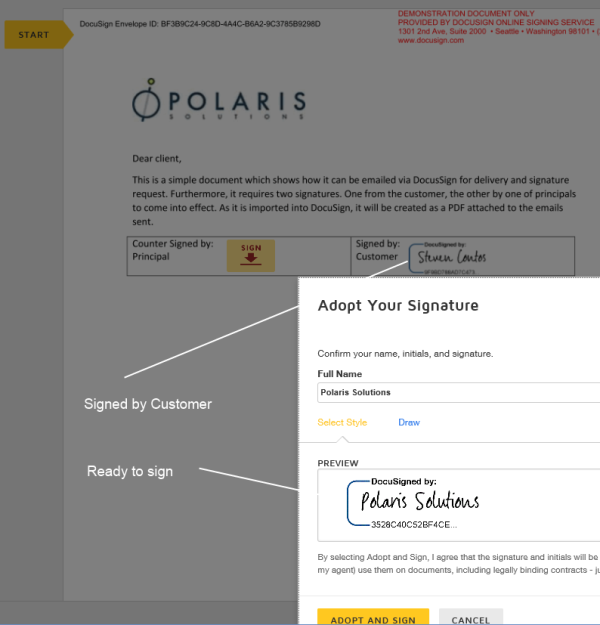
After you create a document and assign a distribution list you will be given the opportunity to annotate the document with fields to be filled in by each email participant in the chain.
DocuSign uses the metaphor of “tabs”, like a sticky tag to indicate where input is required. Types of tabs include signature, date, and check box for acceptance of terms.
By default you place a “tab” in a location on a document for a recipient. Of course when you’re adding document programmatically you may not have the opportunity to assign to a particular page or location on a page. In that event, DocuSign allows you to search for anchor text to anchor a tab too.

The customer will sign first, when signed by the customer Polaris Solutions will be emailed the signed document for counter signing. Note you must agree to their terms to continue.

DocuSign makes an analogy of a physical envelope as to how the document is inserted and sent to a recipient. In my opinion, I would say a better metaphor would be to compare to an inner office envelope (those envelopes used for internal mail and routing) that allow someone who reads the outside of the envelope the instructions to disseminate to a group of people and how returned documents should be subsequently forwarded for further processing
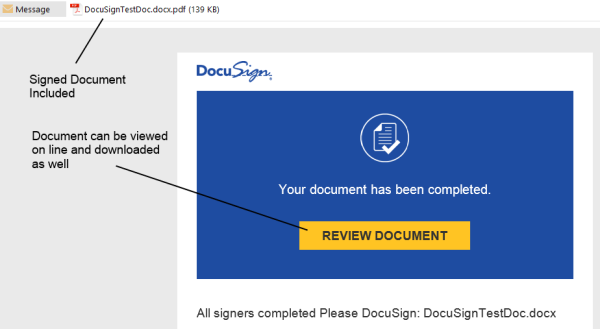
By default, all downstream actors involved in the email chain are given updates via email as to the status of the envelope. By downstream, I mean that the sender will get notification of the first set of emails sent, whether they have been looked at or signed by the actors etc. Recipients which come later in the process, will not get notifications until the rules (this can be changed, but not default) have been satisfied. If you assign a cc to a document (think agent gets a copy of document sent for signature) that person will also get notified going forward as the documents are signed and subsequently counter signed or rejected.
At any point, you can see what the history of the documents are
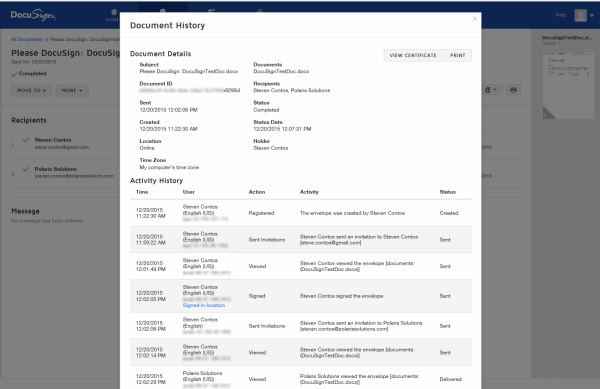
Using these techniques DocuSign allows you to orchestrate a sophisticated document workflow keeping all players in the loop.
Using the RestAPI
You get a real feel that the site is using the same API structure that you as a developer would use to do the same work programmatically. I was able to duplicate the same process shown earlier using a single call to their API. The key is creating a single object filled with the data required to describe the documents, the recipients of the documents and their role (signer, CC etc.) and tabs to be signed for each recipient included.
http://iodocs.docusign.com/
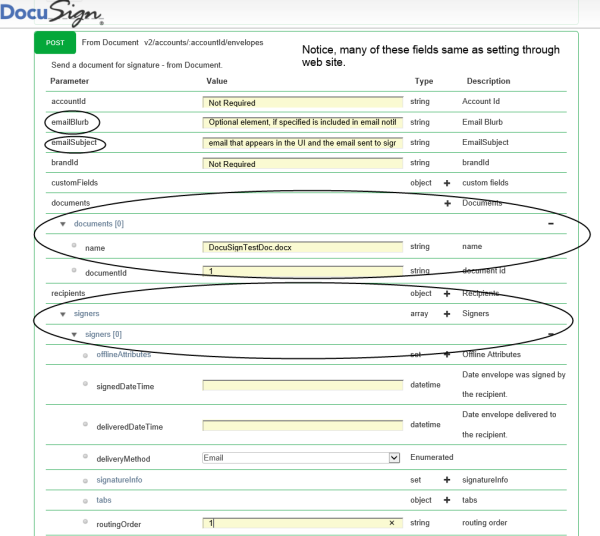
The first step in the process was to confirm using the API Explorer, this allows you to see that the same steps created in the DocuSign portal can be accomplished via their API. The tool is very simple to use and visually supplies similar features found in the portal. The tool also shows the request and response provided.
The API contains well over seventy different API calls but I was able to create everything our client needed with two. The calls are broken down into the following categories:
One call to create the envelope v2/accounts/:accountId/envelopes under Request Signature with all the needed data and another to retrieve information about an existing envelope and modify a recipient email address.
You do have the ability as noted by the categories above to request status information about your envelopes. Beware there is a strict limit on polling their servers for status information for an envelope. Each envelope can be polled once every fifteen minutes. Exceeding this, can cause them to discontinue their service. If you need near real time status of your envelopes, they offer an option called DocuSign Connect which is described as a push service that sends realtime envelope and recipient data updates to customer listener applications.
Calling the RestAPI from code
After you have confirmed that the process meets your requirements, it’s time to implement this same process in code. Since I chose the path of using the Rest API, the next question was how I was going to go forward. Was I going to use a something like Restsharp or roll my own, or was their another option available? As it turns out, DocuSign goes the extra step to create an open source .Net library located in Github, this library provides a simple interface to connect to the Rest API and includes all the classes which represent the data sent to the DocuSign.
https://github.com/docusign/docusign-csharp-client
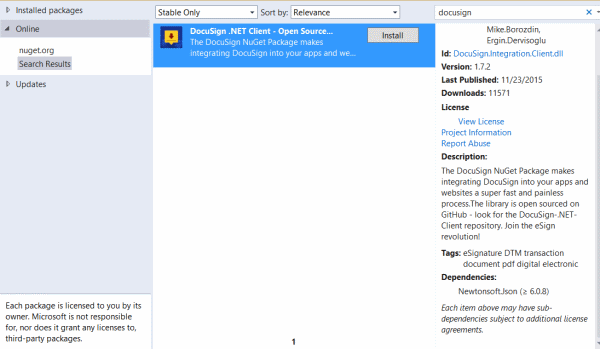
Using the DocuSign .Net Client is really easy to implement. Start by using nuGet to download the latest from the github repository.
To actually recreate what I did through the web portal is rather simple using the DocuSign .Net client library. It is literally accomplished with two calls with the proper objects created with the proper data.
Recently my customer made the business decision to streamline their contracting process. Currently a sales agent will create a set of documents which will be downloaded, printed and signed off by the prospect. Once the prospect signs the contract, it is faxed back and countersigned. After countersigning, the document would be scanned and saved for reference.
After much due diligence, my customer decided to go with a solution provided by DocuSign. It provides the ability to send documents to recipients for their viewing and / or approval.
Background
I was tasked with incorporating this solution using a set of APIs provided by DocuSign. The API calls are provided as both SOAP and Rest implementations and feature an extensive array of documentation and tools to help with implementation.
I made the decision to go forward with the Rest implementation because of the ease of implementation and configuration.
DocuSign provides an API Explorer allowing you the opportunity to explore the API without writing any code. Before using the explorer you will need to create a free developer account with which you can explore both the API and the administration portal of your account.
https://www.docusign.com/developer-center#form-devaccount
Using the portal, you can learn some of the capabilities of DocuSign including creating a new document(s) from uploading an existing document, using a template or getting from a cloud service such as Dropbox or OneDrive. Additionally you will learn to create the email distribution list to send the document(s) to, as well as how to set their order and what each person has to do in the document chain.
After you create a document and assign a distribution list you will be given the opportunity to annotate the document with fields to be filled in by each email participant in the chain.
DocuSign uses the metaphor of “tabs”, like a sticky tag to indicate where input is required. Types of tabs include signature, date, and check box for acceptance of terms.
By default you place a “tab” in a location on a document for a recipient. Of course when you’re adding document programmatically you may not have the opportunity to assign to a particular page or location on a page. In that event, DocuSign allows you to search for anchor text to anchor a tab too.
The customer will sign first, when signed by the customer Polaris Solutions will be emailed the signed document for counter signing. Note you must agree to their terms to continue.
DocuSign makes an analogy of a physical envelope as to how the document is inserted and sent to a recipient. In my opinion, I would say a better metaphor would be to compare to an inner office envelope (those envelopes used for internal mail and routing) that allow someone who reads the outside of the envelope the instructions to disseminate to a group of people and how returned documents should be subsequently forwarded for further processing
By default, all downstream actors involved in the email chain are given updates via email as to the status of the envelope. By downstream, I mean that the sender will get notification of the first set of emails sent, whether they have been looked at or signed by the actors etc. Recipients which come later in the process, will not get notifications until the rules (this can be changed, but not default) have been satisfied. If you assign a cc to a document (think agent gets a copy of document sent for signature) that person will also get notified going forward as the documents are signed and subsequently counter signed or rejected.
At any point, you can see what the history of the documents are
Using these techniques DocuSign allows you to orchestrate a sophisticated document workflow keeping all players in the loop.
Using the RestAPI
You get a real feel that the site is using the same API structure that you as a developer would use to do the same work programmatically. I was able to duplicate the same process shown earlier using a single call to their API. The key is creating a single object filled with the data required to describe the documents, the recipients of the documents and their role (signer, CC etc.) and tabs to be signed for each recipient included.
http://iodocs.docusign.com/
The first step in the process was to confirm using the API Explorer, this allows you to see that the same steps created in the DocuSign portal can be accomplished via their API. The tool is very simple to use and visually supplies similar features found in the portal. The tool also shows the request and response provided.
The API contains well over seventy different API calls but I was able to create everything our client needed with two. The calls are broken down into the following categories:
- Login
- Request Signature
- Views
- Status
- Envelope
- Settings
- Account
- Billing
- Connect
One call to create the envelope v2/accounts/:accountId/envelopes under Request Signature with all the needed data and another to retrieve information about an existing envelope and modify a recipient email address.
You do have the ability as noted by the categories above to request status information about your envelopes. Beware there is a strict limit on polling their servers for status information for an envelope. Each envelope can be polled once every fifteen minutes. Exceeding this, can cause them to discontinue their service. If you need near real time status of your envelopes, they offer an option called DocuSign Connect which is described as a push service that sends realtime envelope and recipient data updates to customer listener applications.
Calling the RestAPI from code
After you have confirmed that the process meets your requirements, it’s time to implement this same process in code. Since I chose the path of using the Rest API, the next question was how I was going to go forward. Was I going to use a something like Restsharp or roll my own, or was their another option available? As it turns out, DocuSign goes the extra step to create an open source .Net library located in Github, this library provides a simple interface to connect to the Rest API and includes all the classes which represent the data sent to the DocuSign.
https://github.com/docusign/docusign-csharp-client
Using the DocuSign .Net Client is really easy to implement. Start by using nuGet to download the latest from the github repository.
To actually recreate what I did through the web portal is rather simple using the DocuSign .Net client library. It is literally accomplished with two calls with the proper objects created with the proper data.
- Step 1, login:
- Set instance properties on the instance of the RestSettings object:
- IntegratorKey
- Later on, the WebServiceUrl (needed when going to production)
- Create the Account object. It requires the following items to be set:
- UserName
- Password
- Account Email
- Login using the Account instance.
RestSettings.Instance.IntegratorKey = _AccountInfo.IntegratorKey;
RestSettings.Instance.WebServiceUrl = @"https://*********/restapi/v2";
Account dsAccount = new Account() { UserName = _AccountInfo.UserName, Password = _AccountInfo.UserPassword, Email = _AccountInfo.UserEmail };

if (dsAccount.Login())
   {
     //Envelope created here and sent when login is successful
   }
Step 2, prepare envelope and send if login is successful:
- Create an Envelope
- Set the Status to “sent” (if not set to sent the document will be created as a draft and never be sent)
Envelope ev = new Envelope();
ev.Status = "sent";
- Add a new Recipients object to the envelope
- Add a list of Signers to the Recipients
- For each Signer add the tabs for signature (or other types)
ev.Recipients = new DocuSign.Integrations.Client.Recipients();

List<Signer> ls = new List<Signer>();

foreach (signer you want to add)
{
      Signer person = new Signer() { name = Name, email = Email, recipientId = Id.ToString(), routingOrder = OrderId.ToString() };
 //Add tabs to each person (if needed)
        person.tabs = new Tabs();
        foreach (tab you want to assign to the person)
        {
    //We use the AnchorText to have the tab placed next to text specified
    ltab.Add(new Tab() { name = tb.Name, anchorString = tb.AnchorText });
    //tabs have a list for each type
    person.tabs.signHereTabs = ltab.ToArray();
                //or
                person.tabs.initialHereTabs = ltab.ToArray();
                //or
                person.tabs.fullNameTabs = ltab.ToArray();
 }

ev.Recipients.signers = ls.ToArray();

}
- Optionally add the following to the envelope:
- Signers of other types (carbon copies)
- Notifications (reminders and expiration's)
ev.Notification = new Notification();
ev.Notification.UseAccountDefaults = false;
//Send a reminder email to sign
ev.Notification.Reminders = new Reminders() { ReminderDelay = 1, ReminderEnabled = true, ReminderFrequency = 3};
//Send an email to warn the document will expire and no long be able to be signed
ev.Notification.Expirations = new Expirations() { ExpireEnabled = true, ExpireWarn = 2, ExpireAfter = 3 };
- Add a list of Documents to the envelope
- Attach the Account document to the envelope
- Call Create to send the document byte data and document metadata.
- If the response is true, the envelopeID will contain the string DocuSign ID, otherwise the Envelope.RestError.message will contain the reason for failure.
//Byte data for each files
List<byte[]> lb = new List<byte[]>();
//Document data for each file.
List<Document> ld = new List<Document>();

int docId = 1;

foreach(file)
{
 //in our case all the documents sent were already PDF files.
 lb.Add(getFileBytes("filename"));
 ld.Add(new Document() { name = fileName, documentId = docId.ToString(), fileExtension = "pdf" });
        docId++;
}

ev.Login = dsAccount;
ev.EmailSubject = EmailSubject;

if (ev.Create(lb, ld))
   {
      return ev.EnvelopeId;
   }
   else
   {
      return ev.RestError.message;
   }
Whats Next?
After getting your solution to work, you will want to move it into production. DocusSign requires a process to certify your application.
From DocuSign:
After you have developed your integration using your Demo Integrator Key, you must get that Integrator Key certified before moving to production. During the Certification process we check your integration and make sure...
You have everything you need to be successful technically
You are not doing anything strange, like polling the DocuSign service every 5 minutes
You have built an integration that puts both DocuSign and our joint solution in the best possible light
Any security concerns are addressed
The result of Certification is that your Integrator Key will function with API calls in DocuSign's production environment as opposed to just the demo environment (where your developer sandbox operates).
Please review the following guide before you start certifying your integration as it will help minimize delays in processing. For most integrations the API Certification process takes 1-2 days.
In Closing:
I found the DocuSign product and services easy and fast to work with, we went from initial discussions to production in less than three weeks. Using the .Net Client we passed certification on our first try.
This has been very helpful. I am trying to set up a button within the my site to "Resend" on demand. Do you know if the notifications will work for that?
ReplyDeleteNot sure that notifications are intended for that. It's been awhile since I have worked on this but the understanding I have is that notifications are setting future events. Either reminders or cancellations. A reminder would remind the person who received the request for signature to sign the document before it expires. Cancellation would occur after the offer has expired (good for N number of days etc). There is an option to resend an envelope to a different recipient assuming the original recipient never signed the document. For example, you put in the wrong email address by accident. Since you never got the document, you could change the recipient and re-queue.
DeleteThe issue of "On demand" is a little trickier. They are really particular about hitting there servers to determine a documents status, in fact, they provide a push notification to get around this. They can shut you down for abuses. If each time you pressed the button, you created a new envelope and sent it might not be an issue.
You will need to work with them to determine costs etc.
Steve
Thank you Steve.
DeleteYou can download the code from the repository and rebuild under .net 4.0, before we upgraded I had to do the same thing. You will see the only dependency on 4.5 is some helper / extensions which can easily be replaced with your own code.
ReplyDelete